What Is Touch Typing? The Complete Beginner's Guide
Look down at your keyboard right now. If you had to hunt for the letter "Q," or you type with two fingers while your eyes bounce between the screen and the keys, you're not touch typing yet — and that's completely normal. Most people never got formal instruction; they just picked up whatever finger habits got them through school or work.
Touch typing is the single biggest upgrade you can make to how you use a computer. It's not about typing fast for its own sake — it's about freeing your eyes and your attention so you can think about what you're writing instead of where the letters are. This guide covers exactly what touch typing is, why it matters, and a realistic plan to learn it, whether you're a student, a job seeker, a programmer, or someone who's typed the "wrong way" for twenty years and is finally ready to fix it.
To put the payoff in numbers: the average typing speed across all typists is roughly 40 WPM, most of whom never learned proper technique. Trained touch typists in professional roles routinely reach 65–80 WPM, and competitive typists — the people who show up on speed-typing leaderboards — regularly exceed 150 WPM. The gap between those numbers isn't natural talent; it's almost entirely technique, and technique is exactly what this guide teaches.
What Is Touch Typing?
Touch typing is the technique of typing without looking at the keyboard, using all ten fingers, with each finger assigned to a specific set of keys. Instead of hunting for letters with your eyes, your fingers learn the keyboard by feel — muscle memory does the work your eyes used to do.
The word "touch" in touch typing refers to touch, not sight: you find each key by the physical feel of the keyboard (helped by small raised bumps on the F and J keys), not by looking down and searching.
Three things define real touch typing:
- All ten fingers are used, each responsible for a specific column of keys.
- Eyes stay on the screen — never on the keyboard — because your fingers already know where every key is.
- A consistent "home" position (the home row) that your fingers return to after every keystroke, so they never get lost.
Someone who types quickly with two or three fingers, glancing down constantly, is not touch typing — no matter how fast their WPM number looks. That distinction matters because two-finger speed has a hard ceiling (usually 40-50 WPM), while touch typing has essentially no ceiling. Professional typists and programmers who type 90-120+ WPM are, without exception, touch typists.
History of Touch Typing
Touch typing wasn't always the standard. Early typewriter users in the late 1800s typed by sight, hunting for each key the way most untrained typists still do today. That changed largely because of one person: Frank Edward McGurrin, a court reporter who, in 1888, taught himself to type without looking at the keys and memorized the entire QWERTY layout by touch.
In a widely publicized 1888 typing contest in Cincinnati, McGurrin faced off against Louis Traub, one of the fastest "visual" typists of the era. McGurrin won decisively, and the demonstration made it obvious that not looking at the keyboard was faster, not slower — a genuinely surprising result at the time. Typing schools quickly began teaching touch typing as the standard method, and within a couple of decades it had replaced hunt-and-peck as the technique taught in offices and schools across the world.
More than 130 years later, the core method hasn't changed. The keyboard layout is the same QWERTY layout McGurrin used, the home row is in the same place, and the finger-to-key assignments taught today are nearly identical to what was standardized in the early 1900s. What has changed is the tool: instead of a typing-school instructor and a mechanical typewriter, you can now learn touch typing for free, in a browser, with a tool like TypingBIRDS providing instant feedback on your speed and accuracy.
Benefits of Touch Typing
The obvious benefit is speed, but it's actually the smallest part of the story. Here's what changes once touch typing genuinely clicks:
- You stop thinking about typing. When your fingers know the keyboard, your brain is free to focus entirely on the content — what you're writing, coding, or transcribing — instead of splitting attention between "what comes next" and "where is that key."
- Your eyes never leave the screen. No more losing your place in a document or on-screen reference material every time you glance down to find a key.
- Errors drop. Touch typists correct mistakes by feel almost as fast as they make them, and consistent finger placement means fewer accidental key presses in the first place.
- Less physical fatigue. Hunt-and-peck typing involves large, repeated hand and wrist movements across the keyboard. Touch typing keeps your hands mostly still, each finger moving a short, fixed distance — which is both faster and easier on your joints over a long day.
- A real, transferable skill. Unlike a habit tied to one keyboard or one job, touch typing works on any standard keyboard, in any language that uses the Latin alphabet, for the rest of your life.
- A practical advantage in exams and hiring. Government typing tests (like SSC CGL/CHSL in India) and many clerical and data-entry jobs set a minimum WPM requirement that is very difficult to clear without touch typing.
Who Needs Touch Typing Most?
Touch typing helps everyone who uses a keyboard, but a few groups get an especially large payoff:
- Students. Assignments, notes, and coding classes all move faster once typing stops being the bottleneck — and typed exams and timed tests increasingly expect a baseline speed that hunt-and-peck simply can't hit.
- Teachers. Beyond your own workload (report cards, lesson plans, emails), teaching touch typing early is one of the highest-leverage skills you can give a class — it compounds across every subject that involves a keyboard for the rest of a student's education.
- Office workers and job seekers. Many clerical, data-entry, and administrative roles set a minimum WPM requirement in the hiring process itself, and a resume that mentions "60+ WPM" is a small but real differentiator in a competitive application pool.
- Programmers. Code has more symbols, punctuation, and shifted characters than ordinary prose, so touch typists who've also drilled the number row and symbol keys get a real, daily productivity edge — less time reaching for brackets and semicolons, more time thinking about the actual problem.
- Anyone who spends hours a day on a keyboard. Remote work, messaging, documentation, email — modern work is typing-heavy in a way it wasn't twenty years ago, and the daily time saved compounds into hours every single week.
Touch Typing vs. Hunt and Peck
"Hunt and peck" is the informal name for typing by searching for each key with your eyes, usually with two to four fingers. It's how almost everyone types before they learn touch typing, and it's a completely reasonable way to start — the problem is that it stops improving.
| Touch Typing | Hunt and Peck | |
|---|---|---|
| Fingers used | All ten, each with fixed keys | Usually 2-4, roaming freely |
| Eyes | Stay on the screen | Move between screen and keyboard |
| Typical speed ceiling | 80-120+ WPM | 40-50 WPM |
| Accuracy | High once learned — fewer mis-hits | Lower — frequent mis-hits from imprecise aim |
| Fatigue | Low — small, fixed finger movements | Higher — larger hand and wrist travel |
| Learning curve | 2-6 weeks of focused practice | None — but progress stalls early |
| Long-term outcome | Speed keeps improving with practice | Speed plateaus and typically stays flat for years |
The core difference isn't really about speed — it's about whether your typing has a ceiling. Hunt-and-peck typists who practice more don't reliably get faster, because the technique itself is the bottleneck. Touch typists who practice more do get faster, because the fingers are already doing the right thing; practice just makes that faster and more automatic.
Finger Placement
Touch typing assigns every key on the keyboard to a specific finger. Instead of memorizing "the letter P is up and to the right somewhere," you memorize "P is my right pinky's reach key" — a much smaller, more physical kind of memory that becomes automatic with repetition.
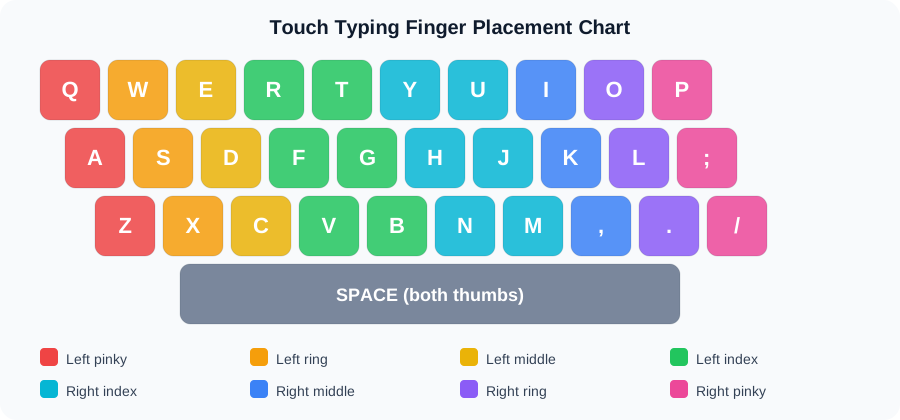
Here's the standard finger-to-key map for a QWERTY keyboard:
- Left pinky: Q, A, Z, and the far-left keys (Tab, Shift, Caps Lock area)
- Left ring finger: W, S, X
- Left middle finger: E, D, C
- Left index finger: R, F, V, T, G, B (the index fingers cover two columns each)
- Right index finger: Y, H, N, U, J, M
- Right middle finger: I, K, comma (,)
- Right ring finger: O, L, period (.)
- Right pinky: P, semicolon (;), and the far-right keys
- Both thumbs: Space bar
Each finger has a small, fixed "reach" — up to the row above, down to the row below, but always returning to its home row key in between. This is what makes touch typing fast: instead of one finger traveling all over the keyboard, eight fingers each cover a small zone, and several can move at once. For the complete finger-by-finger reach chart with drills for each one, see the full finger placement guide.
Home Row Keys
The home row is the middle row of letter keys — A, S, D, F, G, H, J, K, L, and semicolon (;) — and it's the foundation the entire technique is built on. Every finger has one specific home row key it rests on between keystrokes, and every reach up or down starts and ends there.
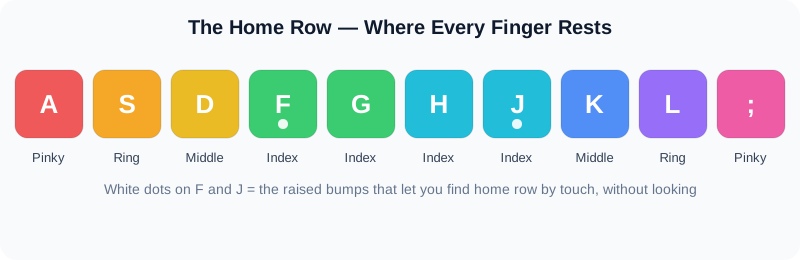
Left hand on the home row: pinky on A, ring finger on S, middle finger on D, index finger on F. Right hand on the home row: index finger on J, middle finger on K, ring finger on L, pinky on semicolon (;).
Most keyboards have small raised bumps on the F and J keys specifically so you can find home row by feel, without looking. Get in the habit of touching those bumps with your index fingers whenever you're not sure where your hands are — it's the single most useful physical habit in all of touch typing, and it's why experienced typists can put their hands on any keyboard, in the dark, and immediately know exactly where every key is. For dedicated home row drills and exercises, see the complete home row keys guide.
Proper Typing Posture
Posture doesn't just prevent aches — bad posture actively works against learning touch typing, because tense shoulders and a badly angled wrist make it harder to return smoothly to the home row. A few basics:
- Feet flat on the floor, knees roughly level with your hips.
- Back straight, shoulders relaxed — not hunched forward toward the screen.
- Elbows close to your body, bent around 90 degrees.
- Wrists straight and slightly raised, not resting heavily on the desk or bent up/down at the keyboard.
- Screen at eye level, roughly an arm's length away, so you're not tilting your neck down.
- Keyboard directly in front of you, not off to one side — an angled keyboard forces one hand to reach further than the other on every keystroke.
None of this needs to be perfect from day one. But if you notice your wrists aching or your shoulders creeping up toward your ears during practice, that's worth fixing early — bad posture habits are almost as sticky as bad finger habits, and both are much easier to avoid than to unlearn later.
Common Beginner Mistakes
A few mistakes show up in almost every beginner, and knowing about them in advance makes them much easier to catch:
- Peeking at the keyboard "just this once." Every glance down resets the muscle-memory learning process a little. It feels harmless, but it's the single biggest reason beginners plateau — the habit needs to break completely, not mostly.
- Chasing speed before accuracy. Typing fast with wrong fingers just cements the wrong habit faster. Slow, correct typing beats fast, sloppy typing every time in the first few weeks — see how to improve typing accuracy for exercises specifically targeting this.
- Not returning to home row. Reaching for a key and staying there, instead of snapping back to the home row key immediately, makes every subsequent reach longer and less accurate.
- Using the wrong finger because it's "faster right now." It rarely is — it just feels faster because it's familiar. The correct finger will be faster within a week or two of consistent use.
- Giving up during the awkward-slow phase. Almost everyone gets temporarily slower in the first week as new finger patterns override old habits. This is normal and it passes — quitting here is the single most common reason people never finish learning.
- Skipping numbers and punctuation. Many people learn the letter keys and stop, then hunt-and-peck forever for numbers, punctuation, and symbols. These deserve the same practice as letters, especially for programmers and anyone typing formal documents.
How Long Does It Take to Learn?
For most people starting from zero, with focused daily practice, the honest answer looks like this:
- 1-2 weeks: Basic finger placement and the home row feel natural; you can type slowly without looking, though you're still much slower than your old hunt-and-peck speed.
- 3-4 weeks: Speed starts to overtake your old two-finger speed. This is usually the most encouraging milestone — the moment touch typing stops feeling like a downgrade.
- 6-8 weeks: Typing without looking feels normal and automatic for most everyday text. Speed keeps climbing from here with ordinary use.
- 3-6 months: Comfortable, confident touch typing at 40-60+ WPM for most learners who practiced consistently, with speed still improving. (For a sense of where that lands you, see what counts as a good typing speed and, if you're tracking a student's progress, typing speed benchmarks by grade level.)
Two things move this timeline more than anything else: how much you already type with the wrong fingers (unlearning old habits takes real time) and how consistent your daily practice is. Twenty focused minutes a day for a month reliably beats two unfocused hours once a week.
Step-by-Step Learning Plan
Here's a practical order to learn touch typing properly, rather than randomly:
- Learn the home row first. Spend two to three days just placing your fingers on A-S-D-F and J-K-L-; and typing simple home-row-only words until it's automatic.
- Add the top row. Q-W-E-R-T-Y-U-I-O-P, reaching up from home row and returning after every keystroke. Practice words that mix home row and top row.
- Add the bottom row. Z-X-C-V-B-N-M and the punctuation keys, reaching down from home row the same way.
- Practice full sentences with all letters. Real words and sentences, not random letter drills, once all three rows feel reasonably solid — this is where speed actually starts to build.
- Add numbers and symbols. The number row and shifted symbols (!@#$%) are usually skipped too early; give them the same dedicated practice as the letters.
- Build speed with timed tests. Once accuracy is consistently high (95%+), start timing yourself and tracking WPM over time to measure real progress — how to type faster covers the specific drills that push speed once technique is solid.
- Practice with real content. Switch from generic drills to the kind of text you'll actually type — code, emails, essays, or exam-style passages — so the skill transfers directly to real use.
Daily Practice Routine
Consistency beats intensity here. A realistic daily routine:
- 5 minutes: Warm-up on the home row and basic finger drills — this "wakes up" muscle memory before real practice.
- 10-15 minutes: Structured lessons or timed typing practice, tracking WPM and accuracy so you can see real progress, not just a feeling of improvement.
- 5 minutes: A short, focused drill on whatever keys gave you the most trouble that day — fixing weak keys immediately, while the mistakes are still fresh, works far better than a separate practice session days later.
TypingBIRDS is a genuinely good fit for this routine: it's free, needs no account to start, and its lessons introduce the home row, top row, and bottom row in exactly the order recommended above, with your WPM and accuracy tracked automatically after every session. If you want some variety, Ghost Racing lets you race your own previous best run, live races let you compete against other typists in real time, and the Daily Challenge gives you a fresh passage to type every day — all good ways to keep a daily habit interesting instead of repetitive.
Conclusion
Touch typing isn't a party trick — it's a foundational skill that pays off every single day you use a keyboard, whether that's writing an email, coding, taking an exam, or chatting with a friend. The method hasn't changed much since it was first demonstrated in 1888: ten fingers, one home row, eyes on the screen. What has changed is how easy it is to learn — a free tool, twenty focused minutes a day, and a few weeks of patience through the awkward early phase is genuinely all it takes.
If you've read this far, you already know more about touch typing than most people who use a keyboard every day. The only thing left is practice — start with the home row today, and give it three honest weeks.
Frequently Asked Questions
What is touch typing in simple words?
Touch typing means typing without looking at the keyboard, using all ten fingers, each assigned to specific keys, so your fingers find letters by feel and muscle memory instead of your eyes searching for them.
Is touch typing hard to learn?
It's not hard, but it does feel awkward and slightly slower for the first one to two weeks, since you're overriding old finger habits. Most people find it noticeably easier and faster than their old typing style within three to four weeks of daily practice.
Can adults learn touch typing, or is it only for kids?
Adults can absolutely learn touch typing — age has very little to do with it. What matters is unlearning old finger habits, which can take a bit more patience for someone who's typed a certain way for years, but the method and the timeline are essentially the same.
Do I need special software to learn touch typing?
No special software is required — any typing tutor or practice tool that shows your WPM and accuracy will work, including free browser-based options like TypingBIRDS. What matters is consistent practice with proper finger placement, not the specific tool.
How many WPM is considered good for touch typing?
Once you're truly touch typing, 40-60 WPM is a solid everyday speed, 60-80 WPM is good, and 80+ WPM is fast. Professional typists and experienced programmers often reach 90-120+ WPM after months or years of consistent typing.
Why do my fingers hurt when I first start touch typing?
Mild discomfort in the first week is common because you're using fingers (especially pinkies and ring fingers) in ways they aren't used to. It should ease up quickly; if pain is sharp or persists, take a break, check your posture and wrist angle, and reduce session length.
Should I look at the keyboard at all while learning?
Try not to, even though it's tempting. Every glance down slows the process of building finger-to-key muscle memory. If you genuinely get lost, it's fine to look briefly to reset your hand position — but treat it as an exception, not a habit.
Does touch typing work for languages other than English?
Yes, for any language typed on a standard QWERTY (or similarly laid-out) keyboard using the Latin alphabet — the same finger-to-key logic applies. Languages with different scripts (like Punjabi typed with Raavi/InScript) use a similar touch-typing principle, just with a different key layout to learn.
Can I learn touch typing without a teacher or class?
Yes — most people today learn touch typing entirely on their own using free online tools and guides like this one. Structured, self-paced practice with immediate WPM and accuracy feedback works just as well as a formal class for the vast majority of learners.
How do I know if I've actually learned touch typing?
You'll know when you can type a full paragraph of ordinary text, at a comfortable pace, without looking at the keyboard even once and without needing to correct wrong-finger mistakes. Speed can keep improving indefinitely after that point — but that "eyes never leave the screen" moment is the real milestone.
Still have questions? The fastest answer is your own number.
Start Practicing Free →Keep reading
Monkeytype vs TypingBIRDS: Which Typing Site Fits You in 2026?
An honest, feature-by-feature comparison of Monkeytype and TypingBIRDS — test styles, racing, classrooms, Punjabi typing, and which site fits your goal.
Typing BasicsWhat Is a Good Typing Speed? Average WPM by Age and Profession
What is the average WPM for typing? See average typing speed in WPM by age and profession, what counts as good, and how to test and improve your own score.
Typing BasicsTyping Practice: The Complete Guide to Getting Faster (2026)
Learn touch typing free with a complete map of typing practice — fundamentals, a routine that works, and the right guide for your goal: student, teacher, job seeker, Punjabi typist.
Typing BasicsTyping Practice for Beginners: Your First 30 Days
A day-by-day 30-day typing practice plan for absolute beginners — what to do each week, how long to practice, and how to tell it is actually working.
Typing BasicsFree Typing Speed Test - Check Your WPM and Accuracy Instantly
Take a free typing speed test and instantly check your WPM and accuracy. No signup, works in any browser - see how your typing speed compares.
For TeachersTyping Speed by Grade Level: Realistic WPM Targets from Grade 2 to 12
Realistic typing speed benchmarks by grade — WPM and accuracy targets from grade 2 to 12, plus how much practice time each grade needs.