Home Row Keys Explained: Your First Touch Typing Lesson
Every skill has a starting stance. Boxers have their guard. Swimmers have their streamline. Pianists have middle C.
Typing has the home row keys — and if you learn nothing else about the keyboard, learn this: eight keys in the middle row, A S D F for your left hand and J K L ; for your right, are the foundation that every fast typist on the planet builds on. Not because those letters are special, but because of what they do: they give your hands a home — a fixed base your fingers always return to, so they always know exactly where they are.
This guide is a complete first lesson in touch typing. You'll learn what the home row is, why it works, how to practice it correctly from the very first keystroke, the mistakes that trip up most beginners, and a two-week plan that takes you from "where is the L key?" to typing real sentences without looking down.
What Are the Home Row Keys?
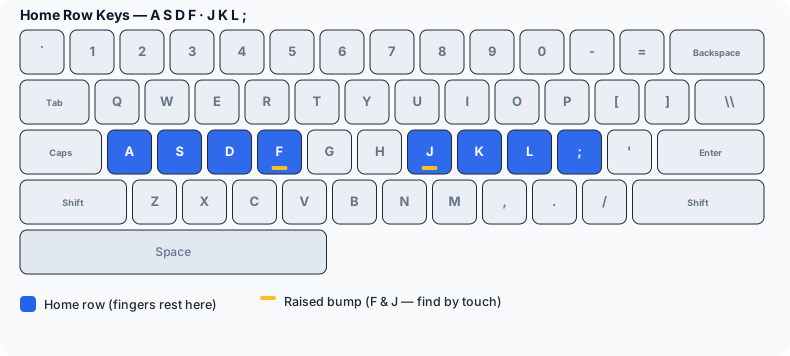
The home row is the middle row of letters on a standard QWERTY keyboard. Eight of its keys are designated resting positions — one for each finger (thumbs get the space bar):
| Hand | Finger | Home Key |
|---|---|---|
| Left | Pinky | A |
| Left | Ring | S |
| Left | Middle | D |
| Left | Index | F |
| Right | Index | J |
| Right | Middle | K |
| Right | Ring | L |
| Right | Pinky | ; (semicolon) |
Two keys in this row matter more than the rest: F and J. Run your fingertips along the middle row of any keyboard — laptop, desktop, even most phone keyboard accessories — and you'll feel small raised bumps on those two keys. They're not decoration. They exist so your index fingers can find the home position by touch alone, which means you can place your hands perfectly without ever looking down.
That's the whole trick of touch typing in one sentence: if your fingers always start from a known position, they can find any key by feel.
Why the Home Row Is the Center of Touch Typing
Touch typing means typing without looking at the keyboard — all ten fingers, eyes on the screen. It's the technique behind every genuinely fast typist, and the home row is its anchor point. Here's the logic:
- The keyboard becomes a map with a "you are here" marker. Without a fixed base, every key press starts from an unknown position, so your eyes must verify everything. With fingers anchored on the home row, the E key isn't "somewhere up there" — it's exactly one step up-left from where your left middle finger is sitting right now.
- Every key is close to home. Keyboard designers placed the home row in the middle for a reason: no letter is more than one row away. From home, each finger makes small, short reaches — and short reaches are fast reaches.
- Return-to-home makes movement predictable. The core rhythm of touch typing is reach, press, return. Because your fingers snap back to the home row after each stroke, the starting point of the next movement is always the same. Your brain gets to automate one small set of movements instead of infinite random ones.
- It frees your mind for the words. When your fingers handle key-finding on autopilot, your conscious attention stays on the sentence you're writing. This is why touch typists can type while thinking, talking, or reading source material — something hunt-and-peck typists can't do.
The home row also happens to include some of English's most frequent letters (A, S, D... and via short reaches, E, T, and I are one step away), so a huge share of real-world keystrokes either start on or stay near home.
If you want the full picture of which finger owns which keys across the entire keyboard, our companion guide covers the complete system: Typing Finger Placement: The Complete Guide. This article focuses on mastering the base itself.
Your First Lesson: Learning the Home Row Step by Step
Ready to actually learn typing? Do this now, at your keyboard, following each step:
- Set your posture. Sit up, feet flat, elbows at roughly 90 degrees, screen at eye height. Good posture makes correct hand position natural instead of forced.
- Find the bumps blind. Close your eyes. Slide your index fingers along the middle letter row until each finds a raised bump. Left index is now on F, right index on J. Open your eyes to confirm — then close them and do it twice more. This "blind landing" is a skill you'll use every single time you sit down to type for the rest of your life.
- Drop the other fingers. With indexes anchored, let your remaining fingers rest naturally on their neighbors: left hand covers D, S, A; right hand covers K, L, ;. Both thumbs float on the space bar. Fingers should be gently curved, like loosely holding an orange — not flat, not clawed.
- Press each home key with its owner. Type slowly: a s d f j k l ; — then backwards: ; l k j f d s a. Feel which finger presses which key. Eyes on the screen the whole time.
- Add the space bar rhythm. Type: asdf jkl; asdf jkl; — pressing space with a thumb between groups. This tiny drill contains the full mechanics of typing: eight fingers, defined keys, thumb spacing.
- Type your first home-row words. The home row alone spells real words: as, ask, dad, sad, lad, fall, flask, salad, alaska. Type each one three times, slowly, correct fingers only. The moment you type "salad" without looking, you are officially touch typing.
- Learn the first reaches. The home row is the base, not the whole game. Add two reaches: left middle finger up to E (then back to D), right middle finger up to I (then back to K). Now you can type: said, aside, like, deal, ideas, seaside. Notice the pattern — reach, press, return home. That return is the habit that makes everything else work.
That's lesson one complete. Everything that follows in touch typing — the top row, the bottom row, capitals, numbers — is just more reaches from the same home base you just learned.
Common Home Row Mistakes Beginners Make
1. Hovering instead of resting. Nervous beginners hold their hands in the air above the home row "to be ready." Floating hands drift, and drifting hands lose the map. Fix: let your fingertips actually touch their home keys with light contact. Resting is the point.
2. Looking down "just to check." One glance becomes five, and soon your eyes are doing the work your fingers should learn. Every peek delays the moment your hands become independent. Fix: trust the F and J bumps. If the urge is irresistible, cover your hands with a tea towel for practice sessions — it feels ridiculous and works brilliantly.
3. Ignoring the semicolon key. Beginners often ask why a punctuation mark gets a whole finger. It's not about the semicolon — it's about keeping your right pinky stationed for its real jobs: P, Enter, Backspace, apostrophe, and Shift. Let it rest on ; even if you rarely type one. Fix: include ; in every drill so the pinky stays home.
4. Pressing hard. Old typewriters needed force; your keyboard needs a feather. Heavy strokes are slower (more travel), louder, and tiring. Fix: practice typing so softly you can barely hear it. Speed lives in light hands.
5. Racing ahead of accuracy. The most tempting mistake of all: speeding up while still hitting wrong keys. Fast mistakes practiced daily become permanent fast mistakes. Fix: hold yourself to near-perfect accuracy at slow speed — genuine speed grows out of clean movements, never the other way around. We explain exactly how to train this in How to Improve Typing Accuracy.
Expert Tips to Make the Home Row Stick
- Practice in short daily doses. Ten to fifteen minutes every day beats an hour twice a week — muscle memory is built by frequency and consolidated by sleep. Two weeks of small daily sessions will do more than a month of weekend cramming.
- Start every session with a blind landing. Hands in lap, eyes closed, find F and J by touch, confirm all eight fingers. Five seconds. It reconnects your hands to the map before you type a single word.
- Narrate fingers, not letters, at first. Thinking "left ring finger" as you press S feels slow but wires the correct association deeper than letter-thinking does. Drop the narration once fingers move on their own.
- Use real words as early as possible. Drills like fff jjj build key-location memory, but words build the transitions between keys — and transitions are what typing actually is. The best typing lessons blend both, which is how the beginner lessons on TypingBIRDS are structured: a few keys at a time, immediately used in real words.
- End each session with one measurement. A single 30–60 second test tells you honestly where you are. Watching your WPM curve rise week over week is the best motivation there is — and on TypingBIRDS the graph after each run shows your speed second by second, so you can even see where in a sentence you hesitate.
- Keyboard basics for comfort: keep the keyboard centered on your body (the B key roughly in line with your belly button), wrists floating rather than planted, and take a 20-second hand shake-out every 15 minutes of practice.
A Two-Week Home Row Practice Plan
| Days | Focus | Target |
|---|---|---|
| 1–2 | Home keys only (asdf jkl; drills + home-row words) | Type home row blind |
| 3–4 | Add E and I reaches; words like said, like, aside | Clean reach-and-return |
| 5–6 | Add T, O, N reaches; short sentences | Eyes on screen 100% |
| 7 | Review + first timed test | Record baseline WPM |
| 8–10 | Add remaining top row; longer words | 95%+ accuracy |
| 11–12 | Add bottom row basics (C, M, comma, period) | Full alphabet reachable |
| 13 | Capitals with opposite-hand Shift | Clean capital letters |
| 14 | Full sentences + second timed test | Beat day-7 baseline |
Don't worry if your day-7 test shows 10–15 WPM. That's normal and temporary. The typists hitting 70+ WPM all passed through exactly this stage; the only difference is they kept going.
Conclusion
The home row is typing's one great shortcut: master eight resting positions and two little bumps, and the entire keyboard reorganizes itself into a map your fingers can read blind. Every reach starts there. Every reach ends there. Everything else in touch typing is just vocabulary added to that one sentence.
Be patient with the first two weeks, guard your accuracy, and return home after every key — the speed arrives on its own schedule, and it always arrives.
When you're ready to practice for real, the free lessons on TypingBIRDS start exactly where this article ends — home row first, new keys added step by step, in English or Punjabi — and the one-minute typing test gives you a baseline today that you'll enjoy demolishing two weeks from now. Then, once your fingers know their way home, take the next step with our complete finger placement guide and learn the whole map.
Frequently Asked Questions
What are the home row keys on a keyboard?
A, S, D, F (left hand) and J, K, L, ; (right hand) — the middle row of letters. Each of your eight fingers rests on one of these keys, and your thumbs rest on the space bar.
Why is it called the home row?
Because it's the position your fingers call home: they start there, reach out to press other keys, and return there after every stroke. It's the fixed base that lets you type by feel instead of by sight.
What are the bumps on the F and J keys for?
They let your index fingers find the home position by touch, so you can place both hands correctly without looking at the keyboard. Anchor on the bumps and every other finger falls into place.
Why does the pinky rest on the semicolon key?
The semicolon itself is rarely typed, but that resting spot keeps your right pinky positioned for its important keys: P, Enter, Backspace, the apostrophe, and Shift. It's a parking space, not a destination.
How long should I practice the home row before moving on?
Two to four short sessions is usually enough to add your first reaches (E and I). You don't need to "finish" the home row before expanding — you need to be able to find all eight keys without looking. New keys are then learned *as reaches from* that base.
Can I learn touch typing as an adult, or is it too late?
It's absolutely learnable at any age. Adults often progress faster than children in the early stages because they practice more deliberately. The only real obstacle is unlearning an old hunt-and-peck habit, which takes a couple of patient weeks.
Should I look at the keyboard while learning?
As little as possible, from day one. The entire skill is training your fingers to know the map so your eyes don't have to. Peeking occasionally while learning a brand-new key is fine; peeking during normal typing is the habit to break.
What typing speed should a beginner aim for?
After two weeks of daily home-row practice, 15–25 WPM is typical. After two to three months, 40+ WPM is a realistic target — which is faster than the average office worker. Accuracy above 95% matters more than any speed number early on.
Are the home row keys the same on laptop keyboards?
Yes — same letters, same positions, same F and J bumps. Laptop keys are shallower, so type with a lighter touch. Everything you learn transfers directly between laptop and desktop keyboards.
What's the best way to practice the home row?
Short daily lessons that start with the eight home keys, add new keys gradually as reaches, use real words early, and give you instant feedback on accuracy. Finish each session with a quick typing test so you can watch your progress build.
Still have questions? The fastest answer is your own number.
Race Your Own Best Time →Keep reading
How to Type Faster: 12 Habits That Actually Add WPM
Learn how to type faster with proven technique fixes, daily drills, and practice modes. A realistic plan to go from 40 to 80+ WPM without bad habits.
Improve Your TypingGhost Racing: How Racing Your Best Run Makes You a Faster Typist
A typing speed test that races you against your own fastest run in real time, so you can spot where you slow down and beat your best WPM score. Free on TypingBIRDS.
Improve Your TypingLive Typing Races: Race Real Players Every 30 Minutes
TypingBIRDS runs scheduled live typing races — a new race every 30 min, up to 10 players, in English and Punjabi. Reserve a seat, race at the bell.
Improve Your TypingDvorak vs QWERTY: Is Switching Keyboard Layouts Worth It?
The Dvorak vs QWERTY debate has lasted 90 years. Real evidence on who types faster, whether switching is worth the cost, and the truth about ergonomics.
Improve Your TypingTyping Finger Placement: The Complete Guide (With Chart)
Learn correct typing finger placement with a full keyboard finger placement chart, step-by-step setup, common mistakes, and drills you can practice free today.
Improve Your TypingHow to Improve Typing Accuracy: 12 Proven Tips and Exercises
Struggling with typos? Learn how to improve typing accuracy with proven exercises, an error-type diagnosis table, and a 14-day plan that works.