Typing Finger Placement: The Complete Guide (With Chart)
Watch a fast typist for ten seconds and you'll notice something odd: they barely move their hands. No hovering, no hunting, no darting index fingers. Their hands look almost lazy — and that stillness is exactly why they're fast.
The secret isn't talent. It's typing finger placement: a fixed system where every finger owns a small set of keys and never wanders outside its territory. Once your fingers know their zones, your eyes stop checking the keyboard, your brain stops spelling words letter by letter, and typing becomes as automatic as walking.
This guide covers everything: the full finger placement chart, how to set up your hands step by step, the mistakes that quietly cap your speed, and drills that make correct placement stick. Whether you're a student, a job seeker facing a typing test, or an office worker tired of 30 WPM, this is the foundation everything else is built on.
What Is Typing Finger Placement?
Typing finger placement (also called keyboard finger placement) is the standard system that assigns every key on the keyboard to one specific finger. It was developed for typewriters more than a century ago and survives unchanged because it solves one problem brilliantly: it minimizes hand movement.
The system rests on three ideas:
- A fixed base position. Your eight fingers rest on eight specific keys — the home row — and return there after every keystroke.
- Exclusive key ownership. Each finger is responsible for a vertical slice of the keyboard. The left index finger presses F, R, V, G, T, and B — and nothing else, ever.
- Reach and return. A finger stretches from its home key to hit a target, then snaps back. The hand itself stays anchored.
Compare that with "hunt and peck" typing, where two or three fingers roam the whole keyboard. Every keystroke requires a visual search, a journey, and a landing. Correct finger placement replaces all of that with a single, tiny, pre-programmed movement.
Why Finger Placement Matters More Than Speed Drills
Many people try to type faster by simply... trying to type faster. It rarely works, because raw effort can't fix an inefficient movement pattern. Here's what correct finger placement actually changes:
- You stop looking at the keyboard. When each finger knows its keys by feel, your eyes stay on the screen. That alone often adds 10–20 WPM, because glancing down and re-finding your place is a huge hidden time cost.
- Errors drop. Fingers pressing keys they own, from a known starting point, land far more reliably than fingers arriving from random directions. (Accuracy is its own skill too — we cover it in depth in How to Improve Typing Accuracy.)
- Your hands last longer. Anchored hands with small finger reaches create far less strain than hands leaping around the board for hours.
- Speed compounds automatically. Once placement is automatic, speed grows with ordinary practice — no forcing required. Typists who learn placement properly routinely pass 60–80 WPM; hunt-and-peck typists usually plateau around 30–40 WPM no matter how many years they've typed.
One honest warning: if you currently type 40 WPM with your own self-taught style, switching to correct placement will make you slower for one to two weeks. That dip is temporary and it's the price of removing your ceiling. Almost everyone who pushes through it ends up faster than they ever were before.
The Complete Finger Placement Chart
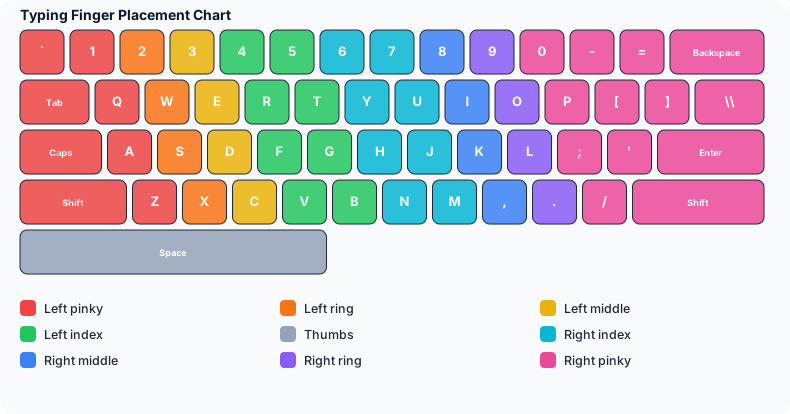
Here is the full standard layout for a QWERTY keyboard. Each finger's column runs diagonally, following the natural stagger of the keys.
| Finger | Home Key | All Assigned Keys |
|---|---|---|
| Left pinky | A | Q, A, Z, 1, `, Tab, Caps Lock, Shift |
| Left ring | S | W, S, X, 2 |
| Left middle | D | E, D, C, 3 |
| Left index | F | R, F, V, T, G, B, 4, 5 |
| Left thumb | — | Space bar |
| Right thumb | — | Space bar |
| Right index | J | U, J, M, Y, H, N, 6, 7 |
| Right middle | K | I, K, comma (,), 8 |
| Right ring | L | O, L, period (.), 9 |
| Right pinky | ; | P, ;, /, 0, -, =, [, ], ', Enter, Shift, Backspace |
A few details worth noticing:
- The index fingers do double duty. Each covers two columns, because the middle of the keyboard (T, G, B and Y, H, N) has to belong to someone. This is why F and J have raised bumps — they're the anchors for your two busiest fingers.
- The pinkies carry the "control" keys. Shift, Enter, Backspace, and Tab all belong to the pinkies. Weak pinky habits are one of the biggest hidden speed limits — more on that below.
- Thumbs only press space. Either thumb is fine; most people settle on one. Don't overthink it.
- Shift is always pressed by the opposite hand. Capital T? Right pinky holds Shift, left index presses T. Capital P? Left pinky holds Shift, right pinky presses P. Using the same hand for both forces an awkward claw and breaks your anchor.
How to Set Up Correct Finger Placement: Step by Step
Follow this sequence exactly the first few times. Within a week it becomes automatic.
- Sit properly first. Feet flat, back supported, screen at eye level, elbows bent about 90 degrees. Posture isn't cosmetic — slumped shoulders push your wrists into angles that make correct placement physically harder.
- Find F and J without looking. Run your index fingers along the middle row of letters until you feel the two raised bumps. These bumps exist on virtually every keyboard on Earth, precisely so you can anchor blind.
- Drop the remaining fingers. With indexes on F and J, let your other fingers fall naturally onto D, S, A (left) and K, L, ; (right). Rest thumbs lightly on the space bar.
- Float your wrists. Wrists should hover level with your hands, not plant on the desk. Planted wrists force your fingers to do all the stretching; floating wrists let your whole hand assist tiny movements.
- Curve your fingers. Imagine loosely holding a tennis ball. Flat, locked fingers are slow; gently curved fingers strike keys with their tips, which is faster and more precise.
- Type one key, then return. Press E with your left middle finger — and bring it straight back to D. This "reach and return" reflex is the single most important habit in all of typing. Practice it deliberately for every key.
- Keep your eyes on the screen. From day one. If you can't resist glancing down, drape a light cloth over your hands or use a blank-keycap trainer. Looking is the habit that keeps all the other bad habits alive.
Common Finger Placement Mistakes (And How to Fix Them)
These five mistakes account for the vast majority of stalled progress. Check yourself honestly against each one.
1. Index finger poaching. Your index fingers are your strongest and most confident, so they "help out" by grabbing keys that belong to weaker fingers — C, E, comma. It feels efficient; it's actually theft. Every poached key drags the whole hand off its anchor. Fix: slow down until the correct finger does the job, even if it feels clumsy for a few days.
2. Resting wrists on the desk. Comfortable, and slow. Planted wrists lock your hands in place so only fingertips can move, making the top row a painful stretch. Fix: hover your wrists; if they tire, your chair or desk height is wrong — adjust the furniture, not the technique.
3. Avoiding the pinkies. Many self-taught typists press A with the ring finger and hit Enter or Backspace by flying the whole right hand over. Your pinkies feel weak only because they're untrained. Fix: deliberately drill pinky keys (A, ;, P, Q, Z) for five minutes a day. They strengthen surprisingly fast.
4. Same-hand Shift. Capitalizing a letter with the same hand that types it forces a claw shape and breaks your placement. Fix: always Shift with the opposite pinky. Drill capital letters slowly until the cross-hand pattern is reflexive.
5. Not returning to home. After a reach, the finger lingers near its target "to be ready." But the next key is unpredictable — the only universally good ready position is home. Fix: between words, consciously confirm all eight fingers are back on their home keys. The F and J bumps confirm it without looking.
Expert Tips for Faster Progress
- Accuracy before speed — always. Practicing fast with wrong fingers doesn't build speed; it builds fast mistakes. Type at whatever speed lets you use the correct finger 98% of the time, and speed will rise on its own. This principle is so important we wrote a whole guide on it: How to Improve Typing Accuracy.
- Short daily sessions beat long weekly ones. Fifteen focused minutes a day rewires muscle memory far better than a two-hour Sunday marathon. Motor learning consolidates during sleep, so frequency wins.
- Say the finger, not the letter. In your first week, silently think "left middle" as you press E. This sounds silly and works remarkably well — it moves the knowledge from your eyes into your hands.
- Watch your weakest transitions. Most typists have two or three specific letter pairs that cause the majority of their errors (often ones involving the ring finger or a same-finger double reach like "ed" or "un"). Identify yours and drill those pairs specifically.
- Test yourself under mild pressure. Timed runs reveal which habits are truly automatic and which collapse when you stop thinking. A one-minute test on TypingBIRDS once a day gives you a clean daily measurement — and the little WPM graph makes progress visible, which keeps motivation alive.
- Don't switch layouts mid-journey. You may read that Dvorak or Colemak layouts are theoretically faster. They are marginally, for experts — but relearning costs months, and QWERTY skill is what every school, office, and government typing test in the US, UK, Canada, and Australia actually measures. Master standard placement first.
A Simple 7-Day Practice Plan
| Day | Focus | Time |
|---|---|---|
| 1 | Home row only: asdf jkl; combinations | 15 min |
| 2 | Home row + E, I (most common vowels off home row) | 15 min |
| 3 | Full top row, slow, correct fingers only | 15 min |
| 4 | Full bottom row + review of days 1–3 | 15 min |
| 5 | Real words, eyes on screen the entire time | 15 min |
| 6 | Capital letters (opposite-hand Shift) + punctuation | 15 min |
| 7 | Full sentences + one timed test to record your baseline | 20 min |
Repeat the week with harder material. Most learners feel placement "click" — fingers moving before conscious thought — somewhere between day 10 and day 21.
Conclusion
Typing finger placement is unglamorous, mechanical, and completely transformative. Eight fingers, eight home keys, fixed zones, reach and return. That's the entire system — and it's the difference between hunting for every letter and having words flow out of your hands while you think about what to say, not how to type it.
Give it three honest weeks. Expect the awkward phase, protect your accuracy, drill your pinkies, and let the F and J bumps guide you home.
When you're ready to put placement into practice, TypingBIRDS has free structured lessons that introduce keys in exactly the order this guide recommends, plus one-minute typing tests that chart your WPM and accuracy over time — a simple way to watch the awkward phase turn into real speed. Start with the home row lesson, and check your baseline with a quick test. Your future self, typing 70 WPM without a single glance at the keyboard, starts with where you put your fingers today.
Frequently Asked Questions
What is the correct finger placement for typing?
Each finger rests on a home key (left hand: A, S, D, F; right hand: J, K, L, ;) and is responsible for the keys diagonally above and below it. Thumbs press the space bar, and each finger returns to its home key after every stroke.
Why do the F and J keys have bumps?
The raised bars on F and J let your index fingers find the home position by touch alone. Anchor your indexes on the bumps, let the other fingers fall in line, and you're correctly placed without ever looking down.
Which finger presses the space bar?
Either thumb. Most typists favor one (often the right), and that's perfectly fine. What matters is that a thumb does it — never an index finger.
How long does it take to learn correct finger placement?
With 15 minutes of daily practice, the placement itself feels natural within 1–3 weeks. Returning to your old typing speed typically takes 2–4 weeks, and after that you'll pass your old ceiling.
I already type fast with my own style. Should I still switch?
If you're above ~50 WPM with a personal style and never need more, switching is optional. But if you're plateaued, look at the keyboard while typing, or face formal typing tests for school or work, correct placement is worth the temporary slowdown — your ceiling with proper technique is roughly double.
Do I need to use my pinkies?
Yes — they own more keys than any other finger, including Shift, Enter, and Backspace. Pinkies feel weak only from lack of training; a week of deliberate pinky drills changes that.
Should my wrists rest on the desk while typing?
No. Wrists should float level with your hands during active typing. A palm rest is fine for pauses, but typing with planted wrists slows you down and increases strain over long sessions.
Is finger placement different on a laptop keyboard?
The letter zones are identical — laptop keyboards keep the same QWERTY stagger and the same F/J bumps. Keys are shallower and closer together, so keep your strokes light. If you type many hours daily, an external keyboard is kinder to your hands.
Which finger types the number keys?
Numbers follow the same columns: 1–2 left pinky/ring, 3 left middle, 4–5 left index, 6–7 right index, 8 right middle, 9 right ring, 0 right pinky. Many people find the number row genuinely hard — drill it separately after letters feel solid.
What's the fastest way to practice finger placement?
Structured drills that introduce keys gradually, starting from the home row, with instant feedback on which finger you used. Practice daily in short sessions, keep your eyes on the screen, and measure yourself with a short typing test once a day to track real progress.
Still have questions? The fastest answer is your own number.
Race Your Own Best Time →Keep reading
How to Type Faster: 12 Habits That Actually Add WPM
Learn how to type faster with proven technique fixes, daily drills, and practice modes. A realistic plan to go from 40 to 80+ WPM without bad habits.
Improve Your TypingGhost Racing: How Racing Your Best Run Makes You a Faster Typist
A typing speed test that races you against your own fastest run in real time, so you can spot where you slow down and beat your best WPM score. Free on TypingBIRDS.
Improve Your TypingLive Typing Races: Race Real Players Every 30 Minutes
TypingBIRDS runs scheduled live typing races — a new race every 30 min, up to 10 players, in English and Punjabi. Reserve a seat, race at the bell.
Improve Your TypingDvorak vs QWERTY: Is Switching Keyboard Layouts Worth It?
The Dvorak vs QWERTY debate has lasted 90 years. Real evidence on who types faster, whether switching is worth the cost, and the truth about ergonomics.
Improve Your TypingHome Row Keys Explained: Your First Touch Typing Lesson
What are the home row keys and why do they matter? Learn ASDF JKL; the right way with step-by-step lessons, drills, and a beginner practice plan.
Improve Your TypingHow to Improve Typing Accuracy: 12 Proven Tips and Exercises
Struggling with typos? Learn how to improve typing accuracy with proven exercises, an error-type diagnosis table, and a 14-day plan that works.